A Weekend Chasing Waterfalls
in Stunning British Columbia
Surely, all the waterfalls can’t be that impressive, right? That’s what we thought before heading to Wells Gray Provincial Park. But by the end of our visit, we were blown away by all the waterfalls we saw; Helmcken, Moul, Dawson Falls to name a few. Wells Gray has over 41 breathtaking waterfalls to discover, and is a perfect destination for a weekend getaway from Vancouver in any season.
Below, we’ve put together a complete weekend itinerary for two days in Wells Gray Provincial Park. You’ll find our recommendations for camping sites, adventure stops, pricing details, and more to help you plan the perfect trip. We left on a Friday afternoon and made it back home by Sunday night.
Getting to Wells Gray from Vancouver
Driving from Vancouver to Wells Gray Provincial Park typically takes about 4.5 to 5 hours, but can vary depending on road conditions, weather, and traffic. For your safety, be sure to check road conditions on Highway 1 and Highway 5 (on drivebc.ca) before you leave, especially during the winter months or after heavy rainfall. These routes can be affected by weather-related delays or closures. The great news, however, is that no park pass or booking is required, so you can head out spontaneously! The park is entirely free to enter and explore (you only need to pay for campgrounds).
Chilliwack, Merritt & Kamloops are all great stops along this route. Merritt is approximately the half-way point on this drive and is great place to fill up on fuel and stretch your legs.

When to Visit
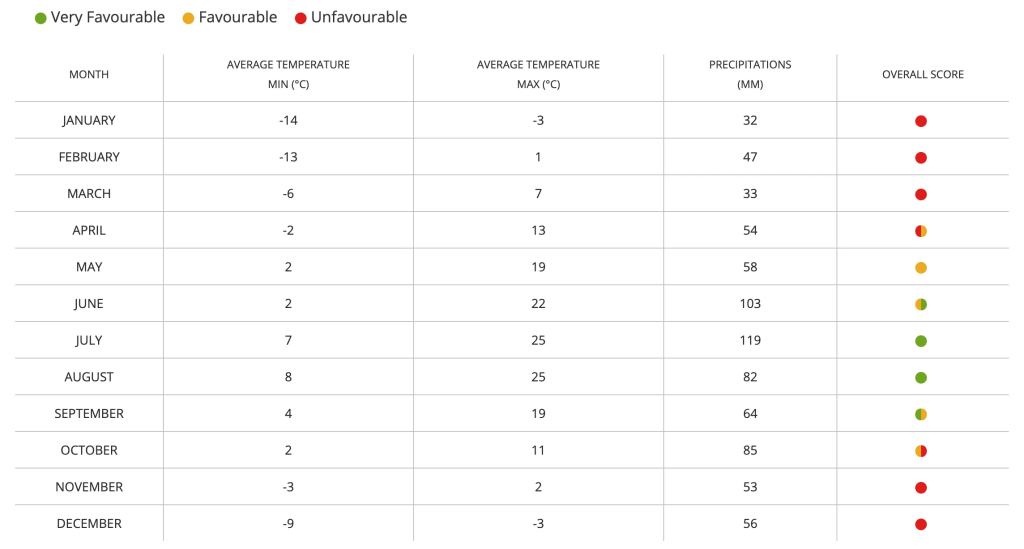
The park is open year-round, but the best time to visit truly depends on the type of adventurer you are. We chose to visit in late June, as it falls within the shoulder season. The weather is still pleasant, and there are less crowds, which we prefer. The most popular times to visit are from July through September. The crowds tend die down as it gets colder, but if you are going in winter, be sure to check which facilities and roads are still operational. Some services are limited during this time.
Regardless of when you go, be prepared for rain. On average, June, July and August are the warmest months but still the wettest. Authentik Canada have a great chart showing the average temperatures and precipitation to help you decide when you should go.
Day-to-Day Breakdown of Activities
Day 1
We left from Vancouver so Day 1 was spent mostly driving. To make the most of your weekend, leave early Friday afternoon ( we took a half-day off work) to reach early evening. You can enjoy a restful night’s sleep before a full day of exploring on Day 2. We did make two stops along the way. One for coffee and snacks, and the other to reward ourselves with a waterfall upon reaching the park. You might be tired from the drive but, if you still have sunlight, we recommend visiting Triple Decker Falls.
Get Coffee and Snacks at Tostana Cafe, Chilliwack
This stop is about an hour from Vancouver and offers the perfect opportunity to stretch your legs and gear up for the long drive ahead. Be sure to also check out the farmers’ market next door, where you can grab some tasty snacks. We picked up iced caramel lattes and enjoyed free cherry samples from the market.
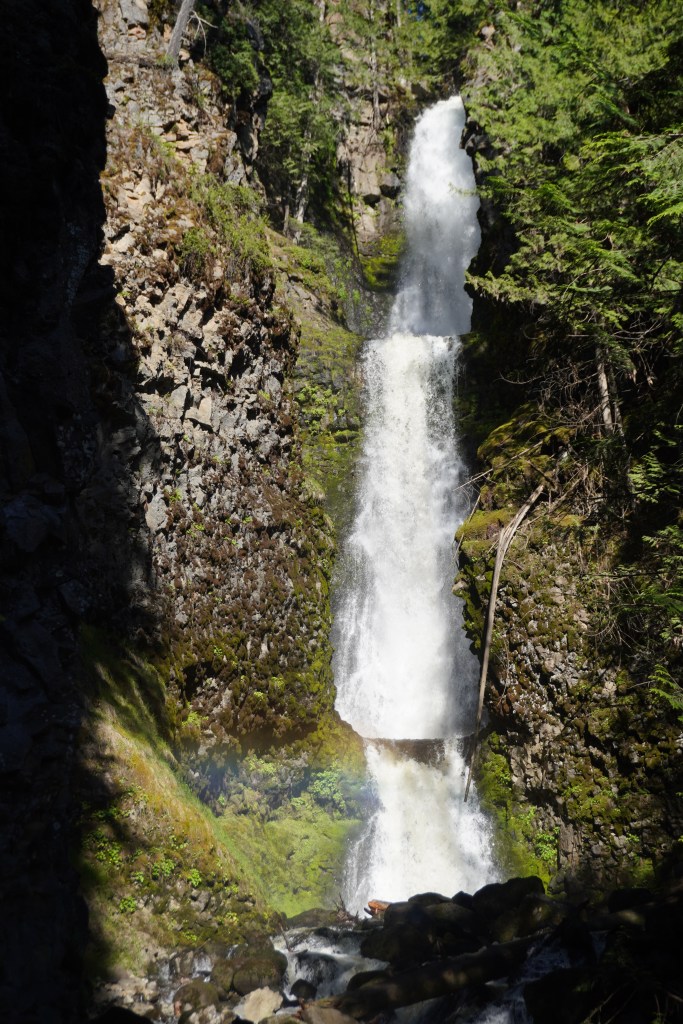
Stretch Your Legs at Triple Decker Falls
We reached Wells Gray at around 6:30 p.m. and because we had lots of sunlight left, we decided to check out the nearby Triple Decker Falls which couldn’t be more appropriately named. It is short 1.3 km (round trip) trail to the falls which takes around 20 minutes to finish. The trail was steep on the way back up, which is why it’s rated moderate. While we didn’t need full hiking shoes, we wore our Vessi Stormbursts, which provided excellent grip for the hike.

We initially thought of visiting Canim Falls and Mahood Falls on the way to Wells Gray. The roads were quite rugged, however, and we didn’t want to risk getting a flat tire. It’s around a 1.5 hr drive on a rocky gravel road so if you have a 4×4, with appropriate tires, and lots of time, this would be a good addition. The Canim Falls Trail is a 2.3 km out-and-back route in Wells Gray Provincial Park that leads to viewpoints overlooking both Canim and Mahood Falls.
We ended the day by staying at the ClearWater Valley Resort’s camp site and had dinner at their restaurant. We were eager to rest up as we had a long day of exploring on Day 2.
Day 2
The Well’s Gray Corridor is the road that takes you from the ClearWater town to ClearWater Lake which is where we ended our day. There are lots of stops and hikes on this road so leave as early as you can. We left our campsite at around 8 a.m. to begin our adventure. There is no food, fuel or signal on this road so be sure to be prepared. Fuel up, grab snacks and water, and download offline maps before heading out.
We recommend stopping by at the Wells Gray Visitor Center beforehand to get as much information as possible. Also, check out the Backcountry Bowls food truck right next to the visitor center. This is a great place to grab some coffee and delicious vegan meals before heading out.
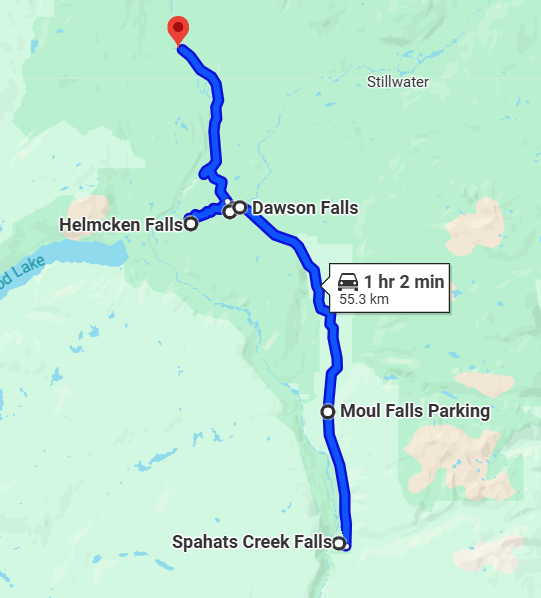
Marvel at Spahat Falls from the Viewing Platform
The first stop on the way is Spahat Falls which is just a 10 minute drive from the ClearWater Valley Resort. After a quick 5 minute walk from the parking lot, you reach the viewing platform. From here, you can view the incredible depth of Spahat Falls and its surrounding lush green landscape. . The falls stand at an impressive 60 m high and was created due to volcanic rocks and numerous eruptions starting around 300,000 years ago. A lot more information can be found on boards scattered around the view platform.
Since this platform is so accessible, we recommend doing this early morning or later in the evening to avoid crowds. We hung out here for around 15 minutes, as it was so peaceful, before heading out on the road again.
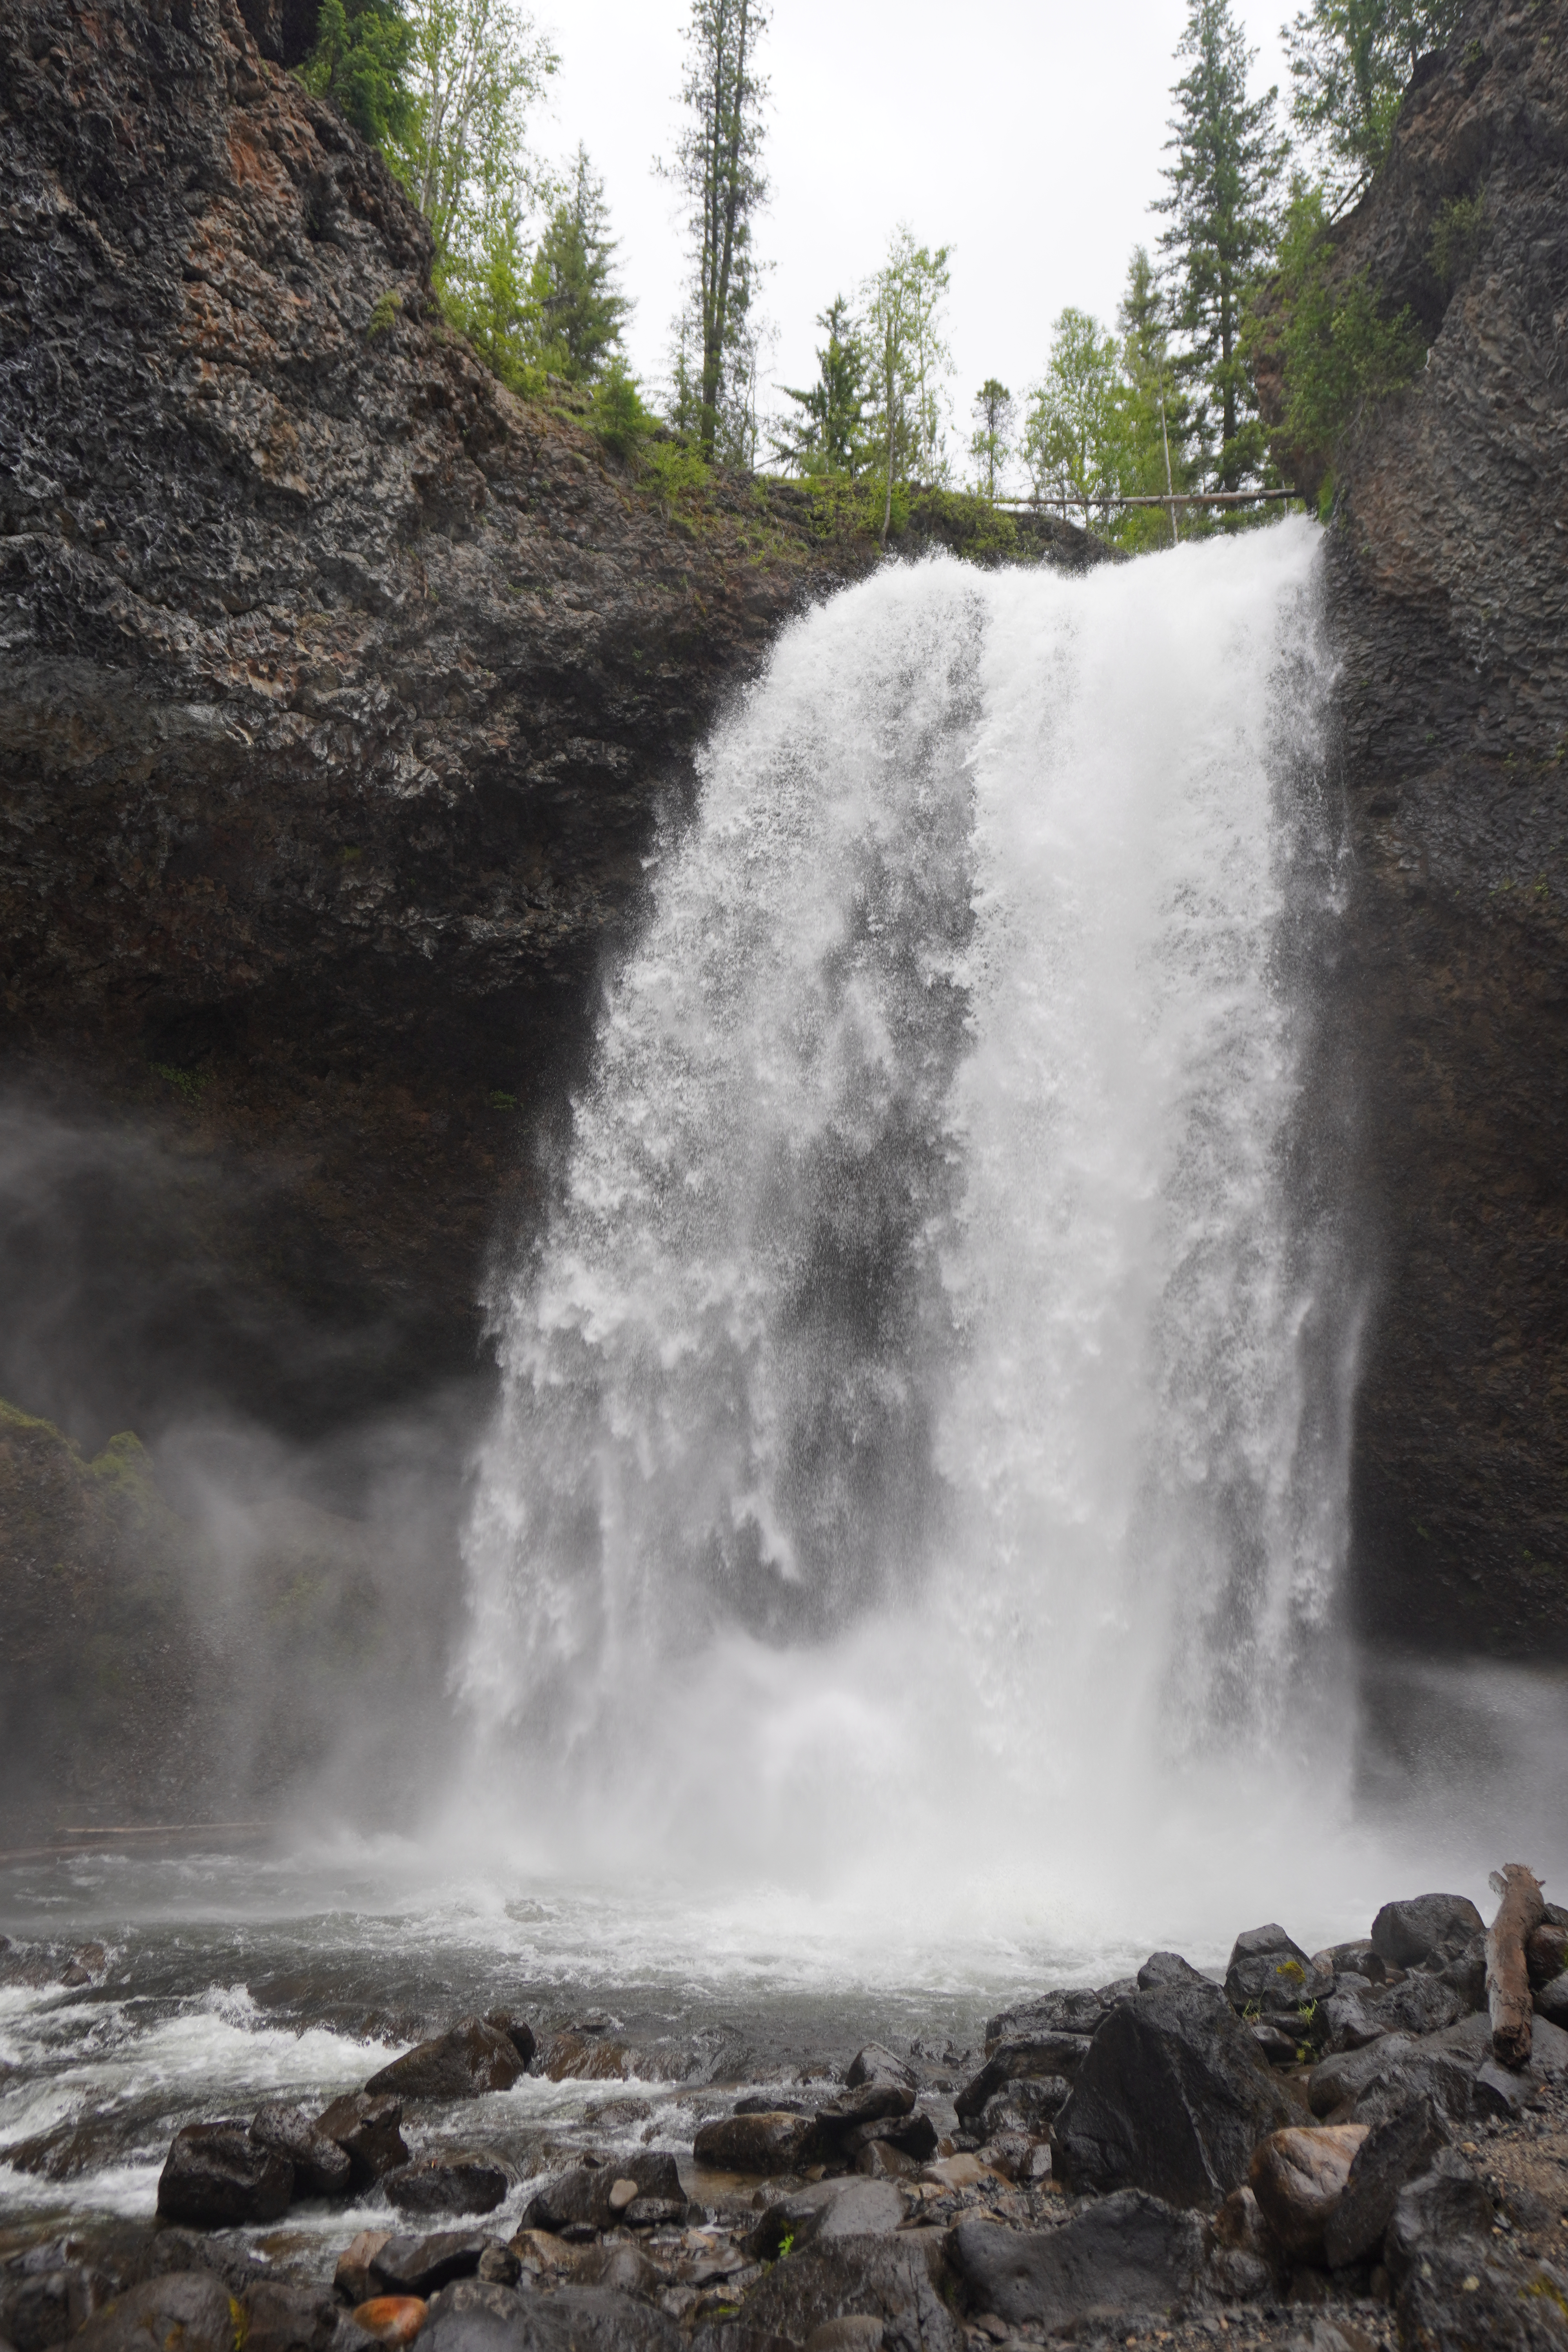
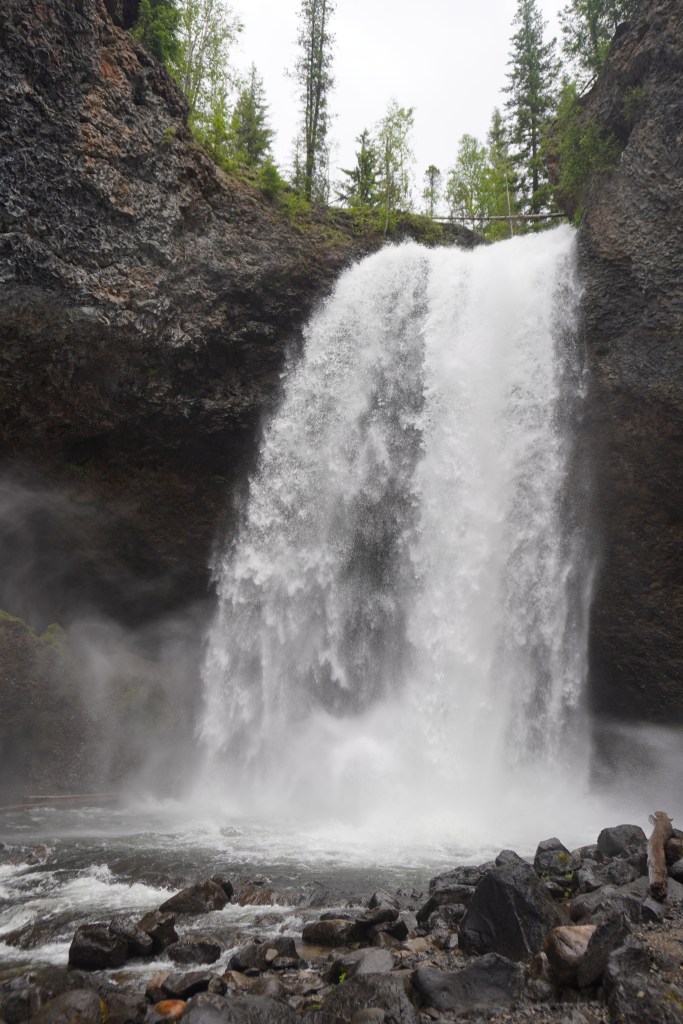
Do a Short Hike to Moul Falls
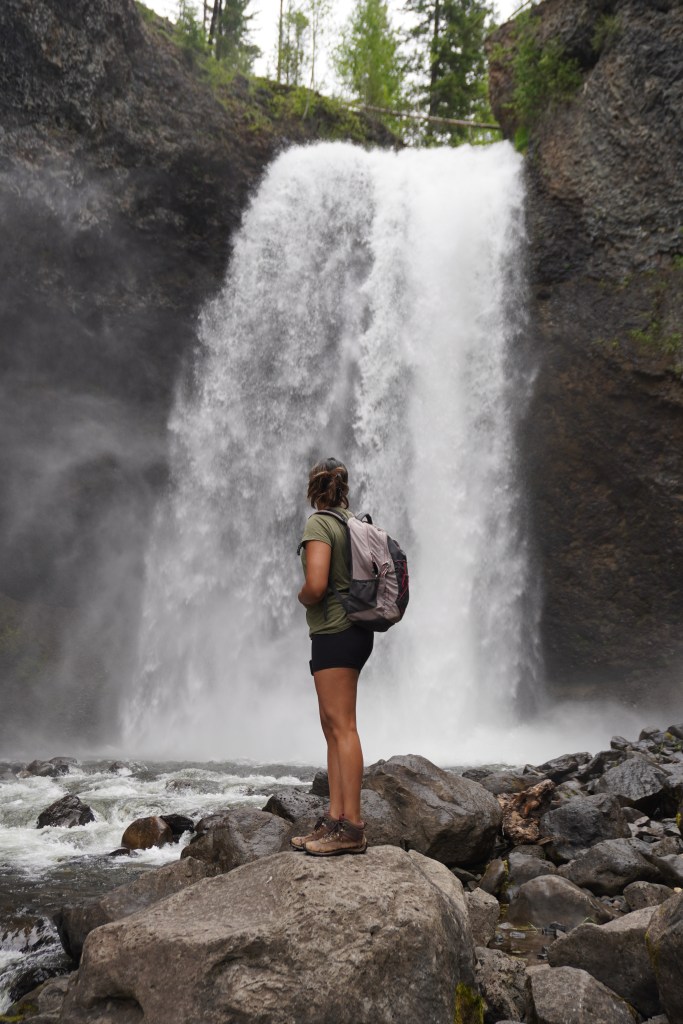
Our next stop was the incredible Moul Falls. The Moul Falls Trail is a 6 km (3.7 miles) round-trip hike that takes about 1.5 to 2 hours to complete, and lets you immerse yourself in the forests of Wells Gray Provincial Park. It is a moderate rated trail and is fairly straightforward. The final descent to the waterfall can be quite slippery so you just to be extra cautious. Experiencing a waterfall in full flow, in such close proximity was awe-inspiring. We’ve seen many waterfalls in our life but this was one of our favorites.
For added safety, make sure you wear the right gear and take an offline alltrails map with you. Because you’re in such close proximity to the falls, be prepared to get sprayed. We recommend wearing a jacket to get warm and dry.
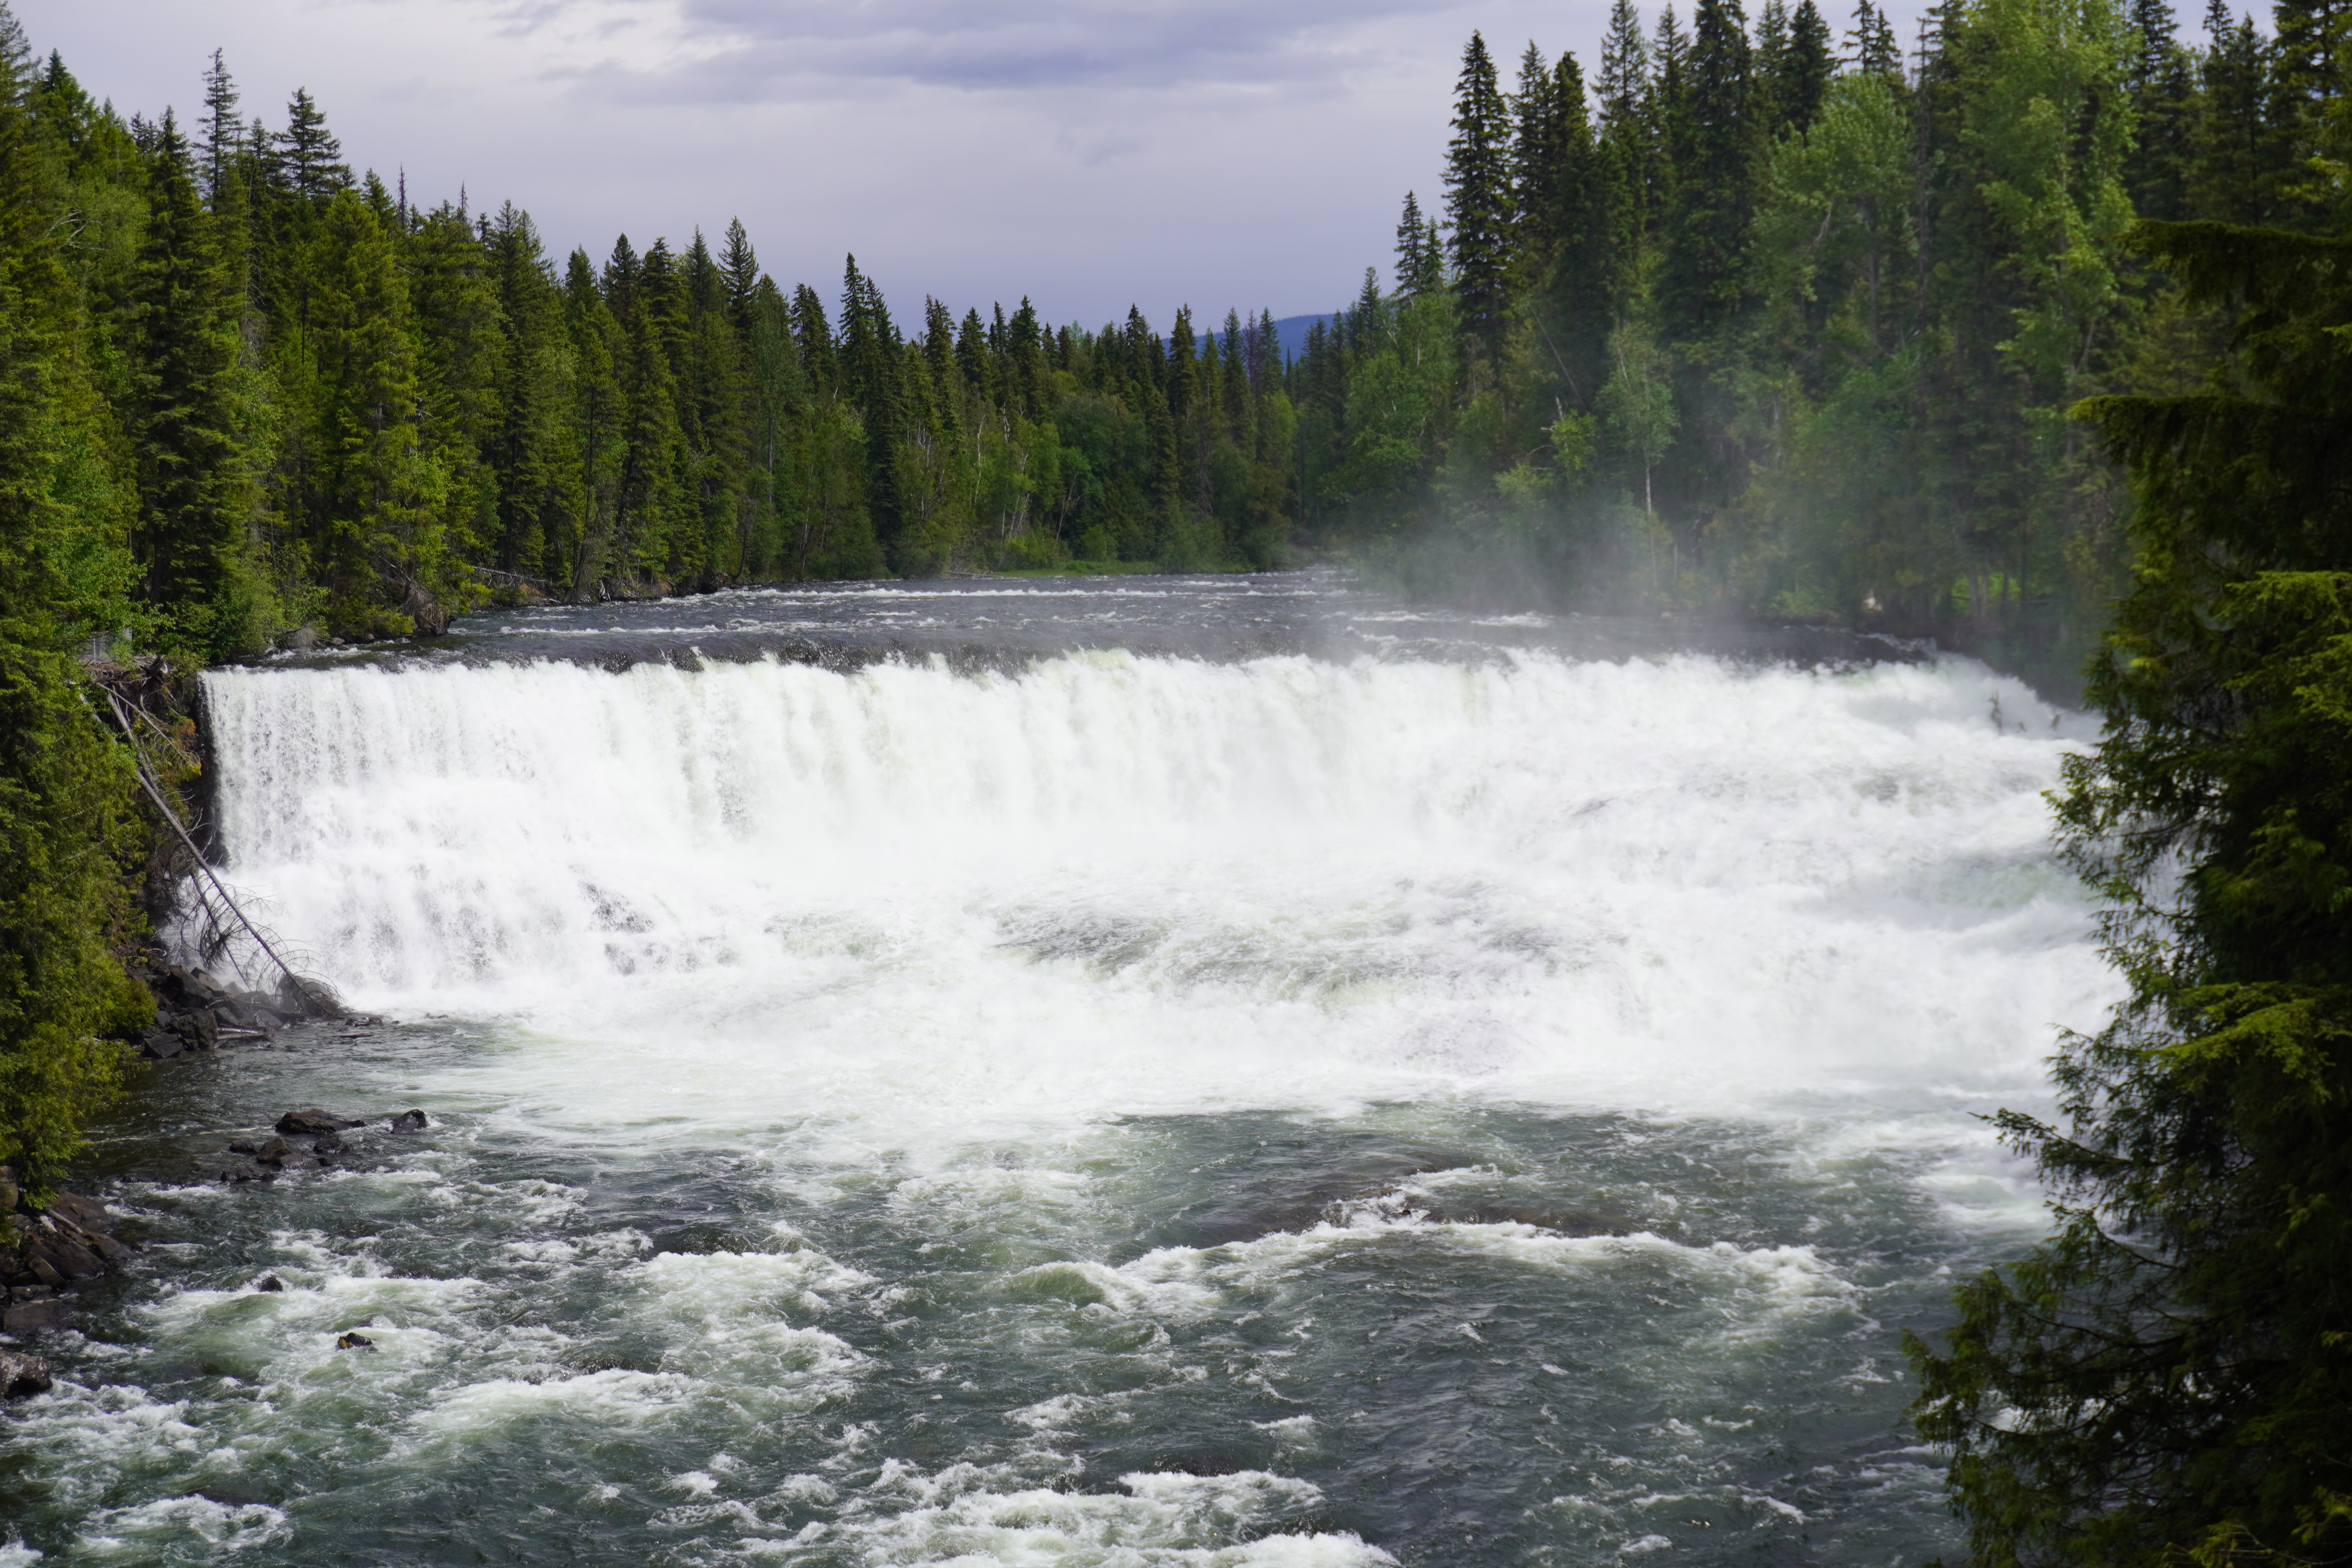
Take a Lunch Break at Dawson Falls
Just a 15 minute drive from Moul Falls is another, but totally different, falls called Dawson Falls. The stop is just on the side of the road. There are usually lots of cars parked so you’ll know you’re in the right spot. From here you can walk a couple seconds to the first viewing platform which gives you a wide view from far away. The view from here is great, but we recommend walking a little further down along the trail to see if up close. The walk should take you around 5 minutes but you get to see the gushing waters from so close you can nearly touch it. Imagine seeing a smaller, more intimate version of Niagara Falls—this is what this falls felt like to us. But most importantly, don’t miss out on having lunch here. The views and peaceful atmosphere will make it an experience you’ll cherish.
For safety, make sure to stay on the designated trails—too many people were veering off. This can be dangerous for you and damaging to the environment.
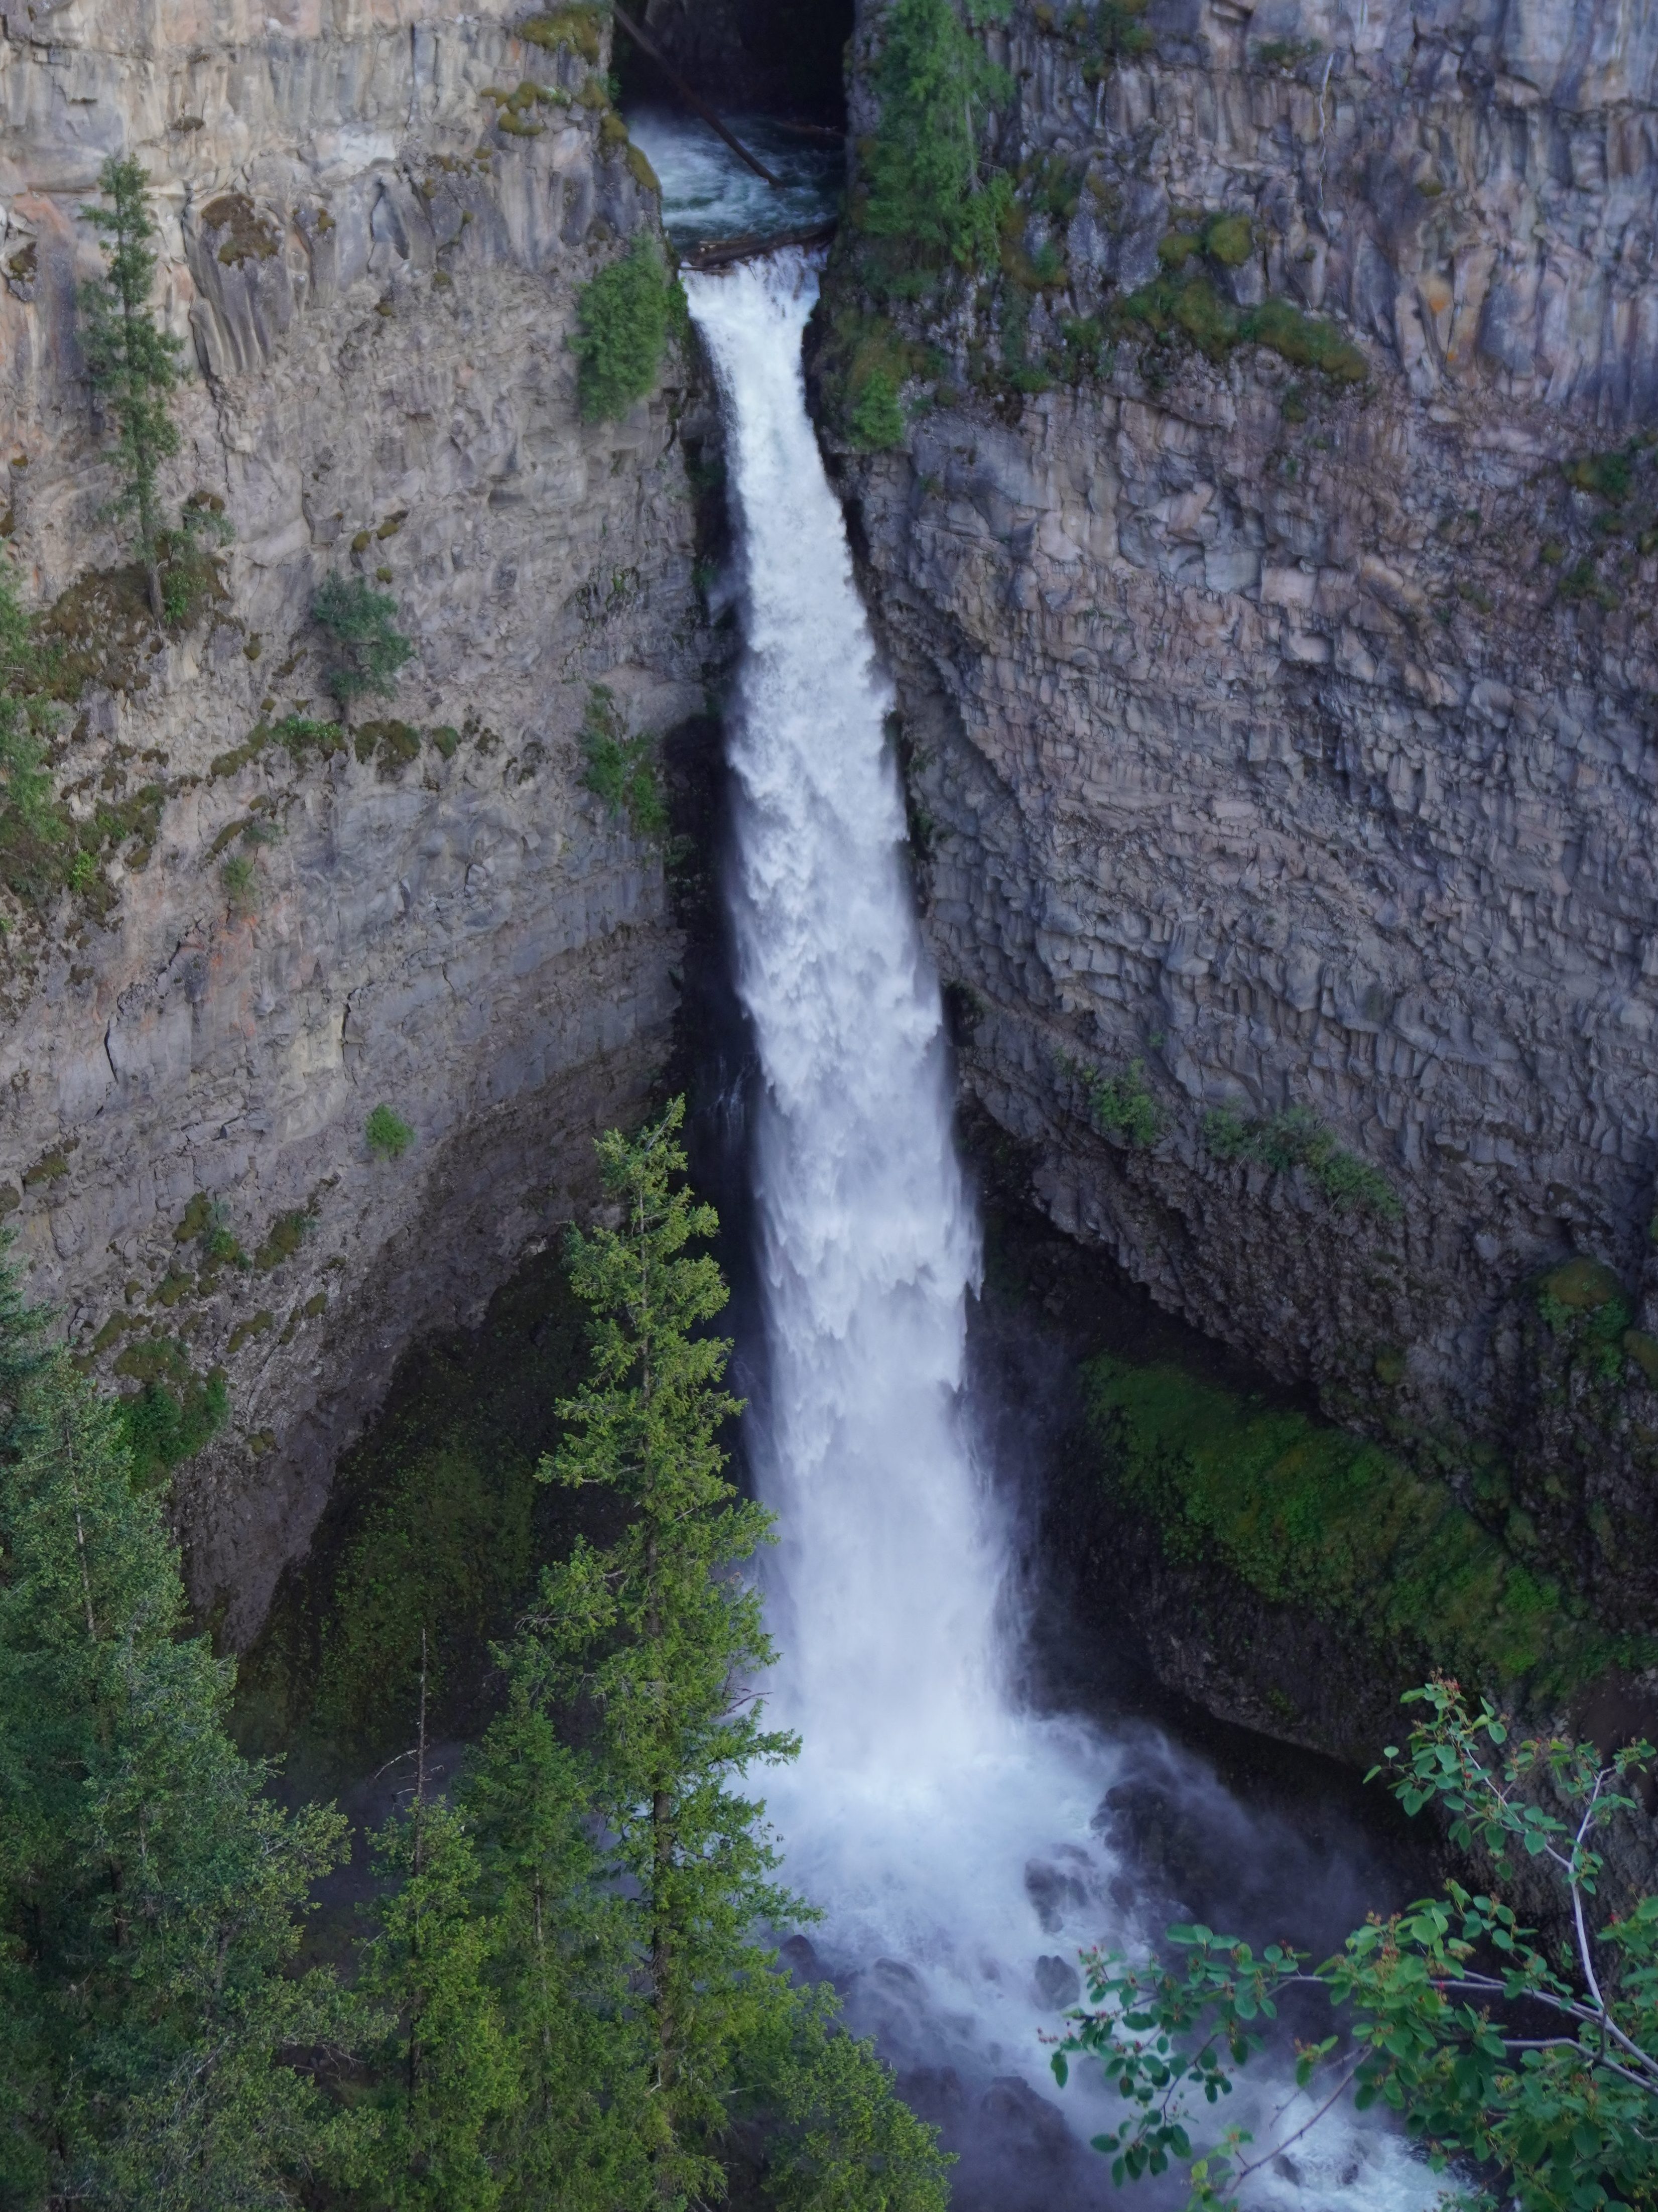
Hike to View the Famous Helmcken Falls
Right next to Dawson falls is the entrance for the Helmcken Falls Rim Hike. This hike is a bit longer than the Moul Falls and had more bugs than we anticipated, but the reward of seeing the mighty Helmcken Falls up close made it worthwhile. The hike typically takes 1.5 to 2 hours and is mostly through forest, with the final stretch opening up to the gigantic waterfall. However, don’t expect an obvious platform—just cliffs (lol)—but trust us, it’s worth it! We wouldn’t consider this hike family-friendly, as there are several cliffs you’ll need to navigate to reach the best viewpoints. You can take your kids but just be careful to not get too close to the edge. If you’re up for a more hiking, definitely add this one to your list!
If you don’t want to hike to the falls, you can drive a further 10 minutes from Dawson Falls to the viewing platform which offers equally amazing views of the falls but from a bit further back. This is one of the main reasons people visit the Wells Gray Corridor. It’s easily accessible, making it well worth the trip for anyone looking to experience the beauty of the area. We didn’t actually drive to this platform as it was closed for maintenance when we visited (June 2024) but is now open.

Admire The Mushbowl During The Drive
Right next to Dawson Falls & the Helmcken Falls Rim Trailhead, is the Mushbowl. You have two great options to experience this mini yet powerful waterfall. You can park right alongside the road and take a short walk up to the falls, or if you’re on the move, enjoy the view from the comfort of your car while crossing the bridge. Either way, you won’t miss this even if you tried.

End Your Day At The Raging Bailey’s Chute
This was the last main stop in the Wells Gray Corridor for us. With ample parking and just a quick hike to the viewpoint, it’s a stop we recommend making. It’s an extremely powerful gushing of water which you can sit and watch for hours. If you visit at the right time—usually in September or October —you can witness the salmon swim upstream. The fact that the salmon can even manage to make the jump across the river is incredible.
From here, you have the option to either head back to Clearwater or continue to Clearwater Lake and stay the night at the Clearwater Lake & Falls Creek campsite. You can just go to Clearwater Lake to explore and head back but it may be too exhausting. This is why we chose to camp there for the night. More information can be found in the Where To Stay section.
It’s important to note that the road after the Helmcken Falls Viewing Platform is not paved, however, it was good enough for us to drive our car (not a 4×4).

Day 3
Day 3 depends entirely on where you decided to stay on Day 2. Since we stayed at the Clearwater lake campsite, we had decided to explore the area. We had a nice walk near the lake and saw the surrounding area. – the camp site has a boat launch so if you had a kayak or canoe, this would be an amazing place to do it.

We decided to try and find Osprey Falls, a nearby waterfall, but sadly failed because we didn’t save this trail on our Alltrails. We didn’t know how long the trail was and wanted to reach back home at a reasonable time. But, if you do find it, the trail is approximately 3.1 kilometers round trip and is considered of medium difficulty. We then heading back home through Kamloops.
Marvel At Rescues At The BC Wildlife Park In Kamloops On Your Way Back
Driving back from an amazing adventure can feel a little depressing, so why not make the journey home a little brighter by looking at cute animals? We visited the BC Wildlife Park in Kamloops. It’s a non-profit sanctuary that’s home to a variety of rescued and orphaned animals unable to survive in the wild. Among the residents are cougars, bears, wolves, reptiles, birds of prey, and the only Kermode bear in human care in the world. We spent nearly two hours walking around, watching these beautiful creatures. The park is super child-friendly, making it a great stop for families, and it only costs 20 Canadian dollars to visit. Just make sure to carry sunscreen and a hat because it get get very toasty if the sun is out.
Where to Stay
If you’re not looking to spend a lot of money, this adventure is perfect for you.
- Clearwater Valley Resort: Located just outside the Wells Gray Corridor, this resort was the perfect choice for us for Day 1. We drove into to the campsite, which only cost us CAD 44 for the night. They have option of camp sites or the more expensive cabins making it a versatile option for lodging. Additionally, to the campsite, we had access to the resort’s restaurant which sells pub-like food. We used their on-site showers and toilets which are included in the campsite booking. Other amenities included a volleyball court and mini-golf!
- Clearwater Lake & Falls Creek Campsite: Located at the beautiful Clearwater Lake, this campsite was a no-brainer for Day 2. For just CAD 29 per night, we had access to amazing views, a basic store, clean bathrooms, showers (for an additional fee), a restaurant, tours (these cost additional money), and more. It was one of the better campsites we’ve stayed at, offering convenience and comfort without the usual hassle. If you’ve ever booked a campsite in BC, you know how exhausting and difficult it can be. Luckily, booking both these campsites did not feel like that. With that being said, do plan in advance as much as possible.
- Alpine Meadows Resort: Although we didn’t stay here ourselves, the resort has been gaining a lot of attention on Instagram, and we’ve had a few friends rave about their experience. If you’re looking to indulge in luxury, this is definitely the place to do it. With its stunning surroundings and top-notch amenities, it’s the perfect spot for a more upscale getaway.
Things to Bring
The season you visit will define most of what you bring. If you are visiting in Spring, like us, it’s important to be prepared for a range of temperatures, from warm days to cooler evenings. Essential gear includes:
- Lightweight, moisture-wicking clothing (we recommend Merino wool clothes for comfort)
- A good-quality summer jacket or fleece for the cooler evenings (Nathan swears by this Columbia fleece)
- A rain jacket (because let’s be real)
- Sturdy hiking boots or trail shoes (we recommend Vessi Stormbursts which worked really well for most hikes – for longer hikes, we switch to our reliable hiking boots)
- Breathable socks (Darn Tough is our go to)
- Hat and Beanie (we recommend the Wander Trails Beanie)
- Sunglasses
- Bug spray
- Sunscreen.
- A Portable Charger (like Anker)
- Some form of entertainment (like card games, an ipad)
If you’re camping, make sure to bring:
- A tent suitable for the season (we use this one with a sleeping pillow)
- A sleeping bag rated for spring temperatures
- A camping stove or portable grill
- A good cooler to keep your food fresh. Stock up on non-perishable snacks for longer outings (local stores in Clearwater can be great for supplies).
- First-aid kit
- A multi-tool
- You can bring a water filter but we were able to fill water from multiple spots
When hiking or exploring, be sure to bring plenty of water (and water purification options), and if you’re venturing into areas with limited cell service, consider downloading offline maps.
Exploring Wells Gray was unforgettable and something we’ve wanted to do for a long time! Whether you’re camping, hiking, or simply soaking in the views, this place offers something for every nature lover.
Remember: the adventure doesn’t have to end here—there’s always more to discover. Explore our other itineraries here.

Leave a comment